Page History
| Created date | Updated date | Affects version | Fix version |
|---|---|---|---|
| 10-10-2022 | Management Console 5.2.0 or newer |
Description
In this article, we are going to look at the required steps to set up SAML integration in the Management Console/Blancco Cloud and Azure AD.
Before we look at the setup steps we are going to highlight some of the information/details which will be required as part of this setup and some prerequisites.
SAML: Security Assertion Markup Language
...
is an open standard for exchanging authentication and authorization data between parties, in particular,
...
between an identity provider
...
and a service provider.
...
SAML is an XML-based markup language for security assertions.
SAML SSO:
...
SAML Single Sign-On is a mechanism that leverages SAML allowing users to log on to multiple web applications after logging into the identity provider. The user only has to log in once, SAML SSO provides a faster, seamless user experience.
Identity Provider
...
— Performs authentication and passes the user's identity and authorization level to the service provider.
Service Provider
...
— Trusts the identity provider and authorizes the given user to access the requested resource.
BMC SAML Integration:
...
In order to perform Azure AD SAML integration with Blancco Cloud/Local BMC following are the pre-requisite:
- Blancco Cloud:
- Identity provider which uses SAML protocol, For e.g. Azure AD.
- Identity provider metadata as an XML file.
- Domain Name, e.g. Blancco.com
- Local BMC:
- Identity provider SSO certificate imported in a JKS file i.e. JKS file containing Identity Provider Signature → Required only if the "Signed authentication request" option is enabled while generating the metadata XML file and identity provider certificate.
Step by step instructions
Before making any changes in the Blancco Cloud/Blancco Management Console it is necessary to first generate an SSO Certificate and XML metadata, the below information covers the steps required for generating these.
How To generate SSO Certificate & XML metadata file - All the below steps need to be executed inside Microsoft Azure Admin Account:
Sign into your Microsoft Azure Account.
- Browse to Azure Active Directory → Enterprise Application → New Application → Non-gallery application → Add your own application → Give a name to the application on this stage e.g.: Cloud Blancco → Add.
- Now Browse to the newly added application in above step "Cloud Blancco" → Click Users and Group → Add User → Here add Users to provide access for SAML authentication.
- Under Manage section for application "Cloud Blancco" → Select "Single Sign On" → Select SAML → Provide the required details to generate Metadata XML file and Certificate.
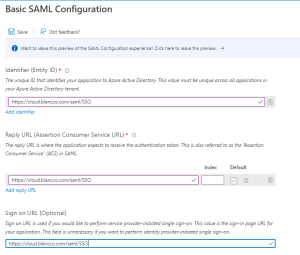
- Required Details are - Refer attached screenshot for reference, the below URL is correct when using the Blancco Cloud, if you are setting up SAML with a locally installed Management Console please adjust the URL to point to your Management Console installation.
- Entity ID: https://cloud.blancco.com/saml/SSO
- Reply URL: https://cloud.blancco.com/saml/SSO
- SignOn URL: https://cloud.blancco.com/saml/SSO
- User Attribute and Claims: Attributes/Claim are not applicable for Blancco Cloud, so skip this setting.
- It is not possible to use "singed authentication request" with the Blancco Cloud so please ensure to disable the option "signed authentication request" before generating the metadata file for use with the Blancco Cloud.
- Now generate the metadata XML and Certificate file on the local machine and Proceed to add XML file to Blancco Cloud (https://cloud.blancco.com)
- Login into the Blancco Cloud/Blancco Management Console with a user account that has Manager/Admin Credentials.
- On the Main Group -> Click Manage Group -> SAML Configuration.
- Upload the Metadata.xml file
- Provide Domain Name.
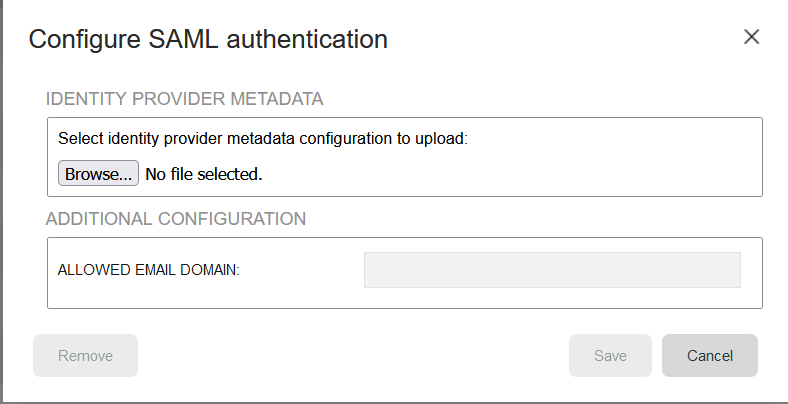
- Save Settings
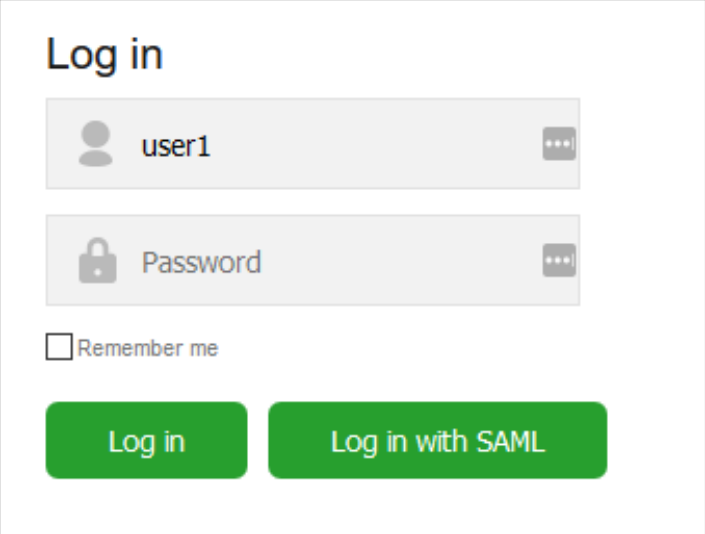
- Logout of the Manager/Admin user account and login with a standard user account using the Login with SAML button now shown
Additional steps for Local Management Console setups
When using the "Signed Authentication request" option with a locally installed Management Console the below steps also need to be completed.
- In order to integrate SAML SSO Login with Local BMC, if "Signed Authentication request" is disabled then above "Step by Step instruction" section can be used for integration.
- If "Signed Authentication request" is enabled then:
- Copy JKS File inside BMC installation directory → Mandatory to make MC to recognize and load signature keys and use them in SAML signature.
Steps by Steps instruction to generate JKS file:
- Execute following command from JAVA HOME/bin directory to create a JKS file:
- keytool -genkeypair -alias my-service-provider -keypass password -keyalg RSA -keysize 2048 -keystore my-sso-keystore.jks
- Import SAML SSO certificate into JKS file - To obtain the SSO certificate file follow section "How To generate SSO Certificate & XML metadata file"
- keytool -import -trustcacerts -alias sso -file ./sso.crt -keystore ./my-sso-keystore.jks
- Post successful import - Copy the JKS file inside MC installation directory.