
Page History
このクイックスタートガイドでは、Blanccoソフトウェアの利用を開始して起動用のBlancco USBメモリを作成するためのガイダンスを提供します。
Blancco Drive Eraser、あるいはBlancco Mobile Diagnostics and Erasureを実行するには、対応するISOイメージを使用した起動用のUSBメモリを準備する必要があります。デバイス/ホストのマシンは、Blancco USB Creatorを使用して作成されたUSBメモリから起動することで、ソフトウェアを起動することができます。
最新バージョンの Blancco USB Creatorは次のリンクからダウンロードできます。
This Quick Start Guide helps you to get started with Blancco software and provide the guidance on how to create bootable Blancco USB-sticks.
In order to run Blancco Drive Eraser or Blancco Mobile Diagnostics and Erasure you will need to prepare a bootable USB-stick using the corresponding ISO image. The software can be booted up by booting the device/host machine from the USB-stick created with Blancco USB Creator.
The latest version of Blancco USB Creator can be found from here: Japanese KB - Download: Blancco USB Creator
In order to create a bootable USB, run the software and follow below steps:
- Press the “Add” key and select the image file.
- Make sure the image files are the correct ones. Click the name under the “Menu entry” to change it.
- Select the bootable media.
- Press “Create” to create a bootable media.
Note. If the "Format" option is selected, the USB will be formatted and existing data on the USB will be removed!
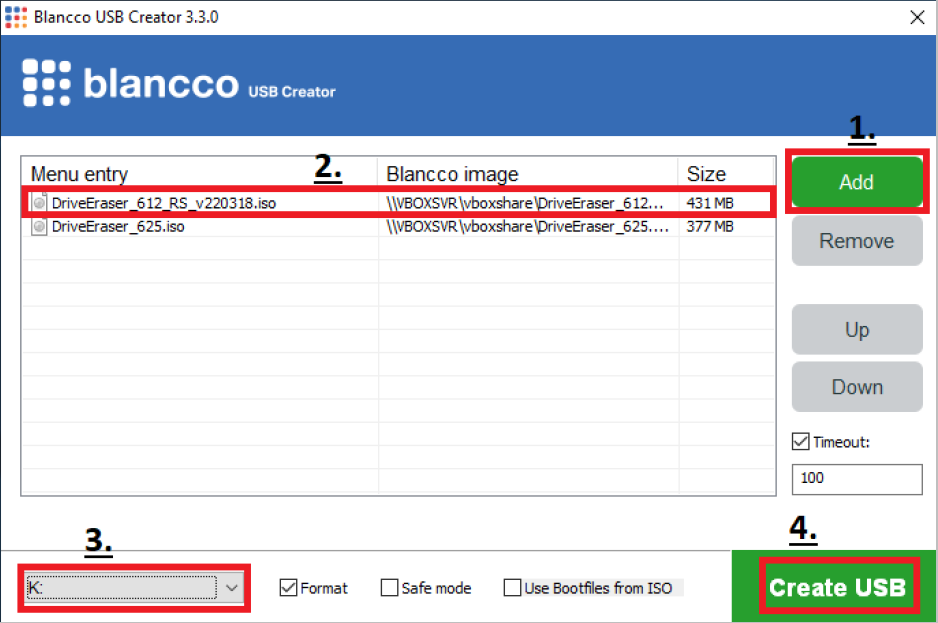
起動用USBメモリを作成するには、ソフトウェアを実行し、次の手順に従います:
- 「追加」キーを押してイメージファイルを選択します。
- イメージファイルが正しいことを必ず確認してください。変更する場合は、「メニューのエントリー」の下に表示されるファイル名をクリックします。
- 起動用メディアを作成するドライブを選択します。
「作成」ボタンを押して、起動用のメディアを作成します。
注意. 「フォーマット」オプションがチェックされていた場合、USBメモリのフォーマットが行われ、既存のデータは削除されます。
詳細、およびすべての機能の一覧についてはユーザーマニュアルを参照してください。ユーザーマニュアルはサポートポータルサイトからご利用いただけます。For more details, please refer to the full user manual, available on Support Portal.