Page History
| Created作成日 | Updated更新日 | Affects version影響を受けるバージョンFix version | 修正バージョン |
|---|---|---|---|
|
| Management Portal Blancco Cloud | N/A |
This page will guide you through the different steps included in the Blancco Management Portal Upgrade Wizard when upgrading from an existing Blancco Cloud environment to the new Blancco Management Portal.
If your company is entitled for the upgrade, users with "manager" role should have been notified through separate email communication and they should be able to access the wizard and start the upgrade process following the instructions provided in the email. If you are unsure whether you are entitled for the upgrade, contact your Blancco Sales Representative or Blancco Technical Support.
What data is included as part of the upgrade?
Below table will provide you with a list of details included in the scope of the upgrade wizard and some key notes related to each item.
...
During the wizard, you can select if you want to automatically migrate over existing users.
NOTE! Depending on your current user hierarchy, some users may receive a higher level of access to the system and get visibility to all your Blancco reports when compared to before.
...
Custom roles are not available in Management Portal.
If a user with a custom role is migrated using the wizard the role will be automatically changed to "Basic User". Generally speaking this grants more permissions to the system.
...
Licenses
...
All licenses will be moved over to Management Portal as the final step of the Upgrade Wizard.
NOTE! This will remove the licenses from the old system and after completing the step you will need to run your production against Management Portal!
...
EMS entitlement capability
...
Workflows
...
All available workflows are migrated over.
NOTE! Default workflow information is lost during the transfer and default workflows will need to be manually re-selected after completing the wizard.
...
Reports
...
Possibility to copy over no reports, last 6 months or last 12 months reports.
If you require older reports to be migrated over they need to be transferred manually. See Transferring Reports from Blancco Cloud to Blancco Management Portal for more details.
このページでは、既存のBlancco Cloud環境から新しいBlancco Management Portalへのアップグレードする時に使用する、Blancco Management Portalアップグレードウィザードの処理ステップについて説明します。
アップグレードの対象となる場合、「manager (管理者) 」ロールを持つユーザーに、別途電子メールの通知が送信されます。電子メールに記載された指示に従ってウィザードにアクセスし、アップグレード処理を開始することができます。アップグレードの対象となるかどうか不明な場合には、Blanccoの営業担当またはテクニカルサポートにお問い合わせください。
アップグレードにはどのようなデータが含まれますか?
下記の表は、アップグレードウィザードの対象範囲に含まれるデータの一覧と各項目に関連する重要な注意事項を示しています。
| カテゴリ | アップグレードウィザードの構成要素に含まれるか | 補足情報 |
|---|---|---|
| グループ/サブグループ | 含まれる。 ユーザーによる選択設定が可能 | ウィザードの実行時に、既存のグループを自動的に移行するかどうかを選択できます。 |
| ユーザー | 含まれる。 ユーザーによる選択設定が可能 | ウィザードの実行時に、既存のユーザーを自動的に移行するかどうかを選択できます。 注意! 現在のユーザー階層によっては、一部のユーザーは以前よりも高いレベルのシステムへのアクセス権が与えられ、すべてのBlanccoレポートを参照できるようになる可能性があります。 |
| 定義済みのユーザーロール | 含まれる | あらかじめ定義されたユーザーロールにはManager、Basic User、Auditorがあります。 |
| カスタムのユーザーロール | 含まれない | Management Portalではカスタムロールは使用できません。. カスタムロールを持つユーザーをウィザードを使用して移行すると、ロールが「Basic User」に自動的に変更されます。この変更により、一般的にはより多くの権限が付与されます。 |
ライセンス | 含まれる | アップグレードウィザードの最終ステップで、すべてのライセンスがManagement Portalへ移行されます。 注意! これにより、旧システムからはライセンスが削除されます。ステップ完了後は、Management Portalで本番運用を行う必要があります! |
EMSエンタイトルメント機能 | 含まれる | Blancco Cloudのグループで機能が有効になっている場合に限ります。 |
ワークフロー | 含まれる | 利用可能なすべてのワークフローが移行されます。 注意! デフォルトのワークフロー情報は転送中に失われます。ウィザードの完了後、手動でデフォルトのワークフローを再度選択する必要があります。 |
レポート | 含まれる。 ユーザーによる選択設定が可能 | レポートなし、直近6ヶ月、直近12ヶ月のレポートをコピーすることが可能です。 さらに古いレポートを移行する必要がある場合は、手動で移行する必要があります。詳細手順は「Blancco CloudからBlancco Management Portalへのレポート転送」を参照してください。 |
アップグレードウィザードの処理ステップ
Blancco Cloudにログイン後、別途送信されるEメールコミュニケーションマネージャの指示に従ってアップグレード処理を開始すると、「Upgrade available (アップグレード可能) 」というバナーが表示されます。

| Info |
|---|
アップグレードを最初から延期したりアップグレードウィザードを任意の時点で閉じたりすることもできます。それまでの進捗はすべて保存されます。アップグレードの続行を選択すると、以前にウィザードを閉じたステップから処理を再開します。 |
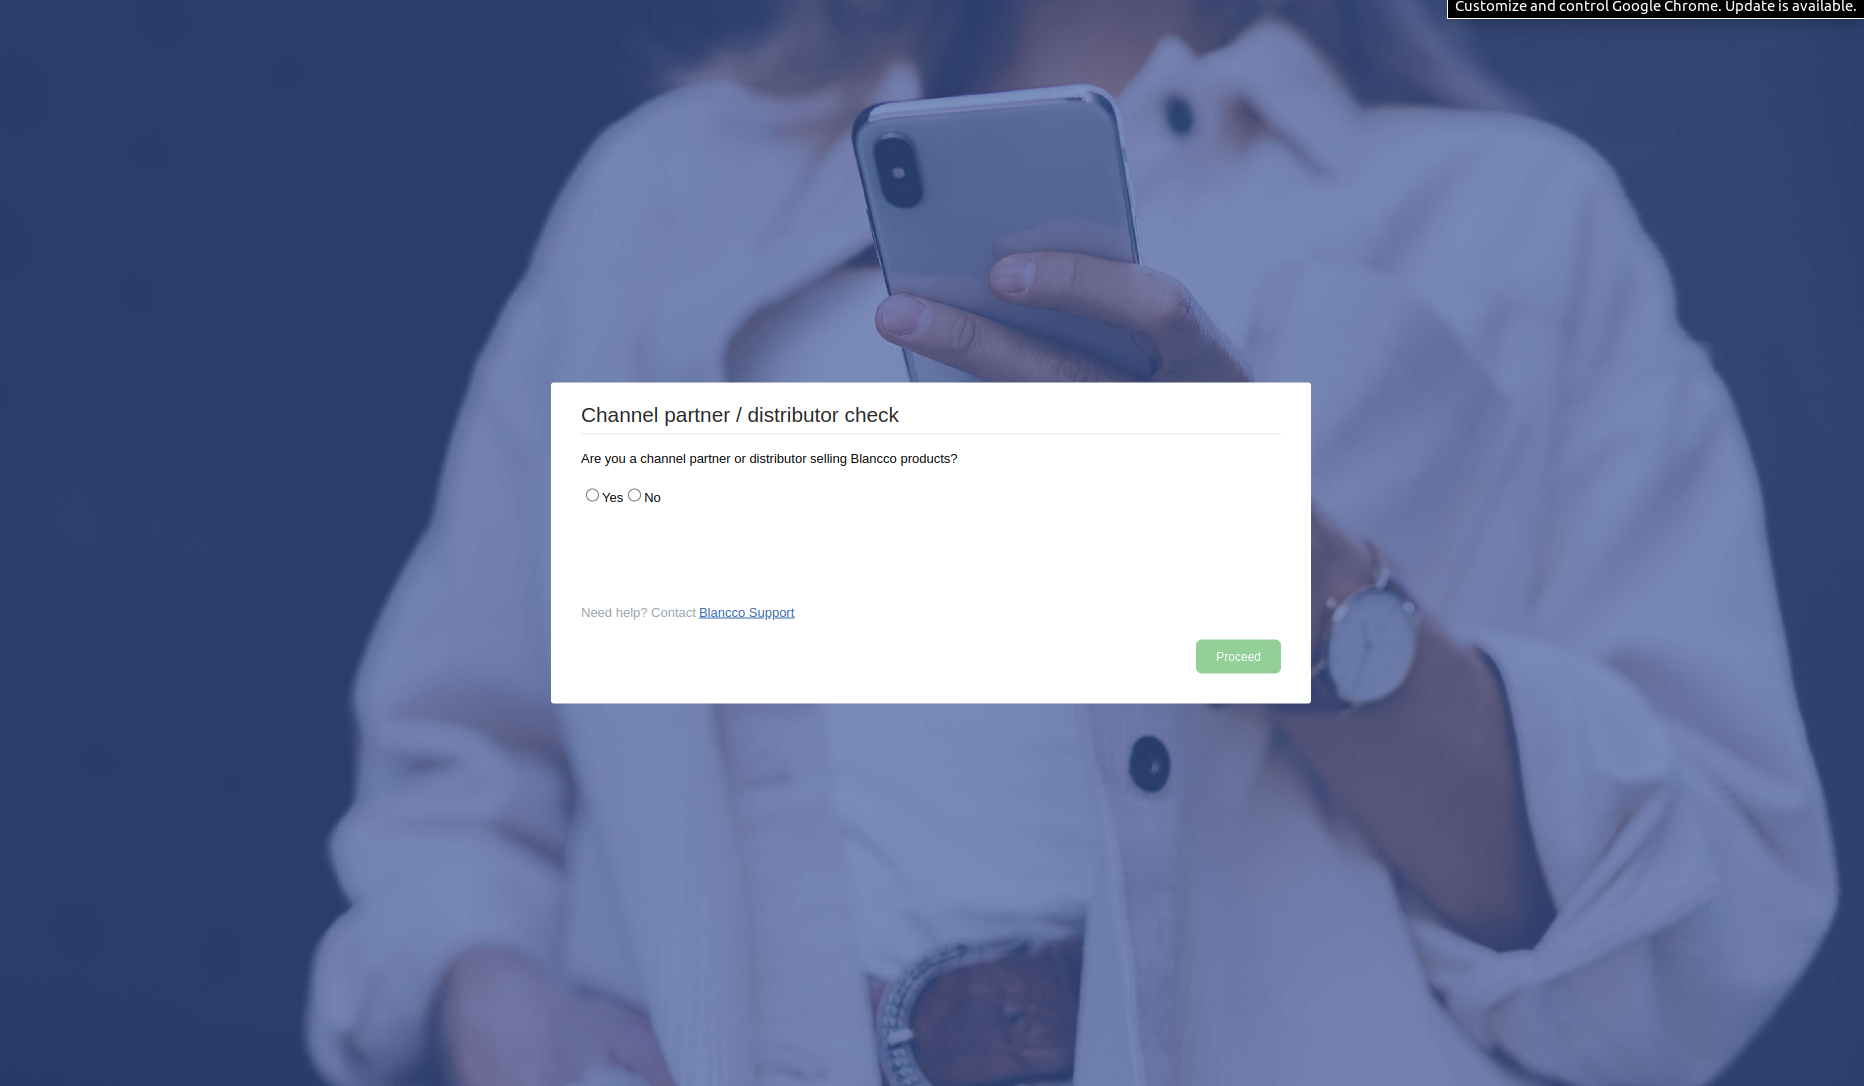
- 最初、Blancco Managment Portal Upgrade Wizardにはお客様がチャネルパートナーまたはディストリビューターに該当するかを質問します。該当しない、つまり「No」を選択すると、次の画面に進みます。
- 「Welcome
Upgrade Wizard steps
After the upgrade process is started following the instructions provided in the separate email communication manager users will see an "Upgrade available" banner after logging in to the Blancco Cloud.
| Info |
|---|
Note that you can close the upgrade wizard at any point or post pone the upgrade initially and any progress made will be saved. When you choose to proceed with the upgrade you will continue from the step you closed the wizard previously. |
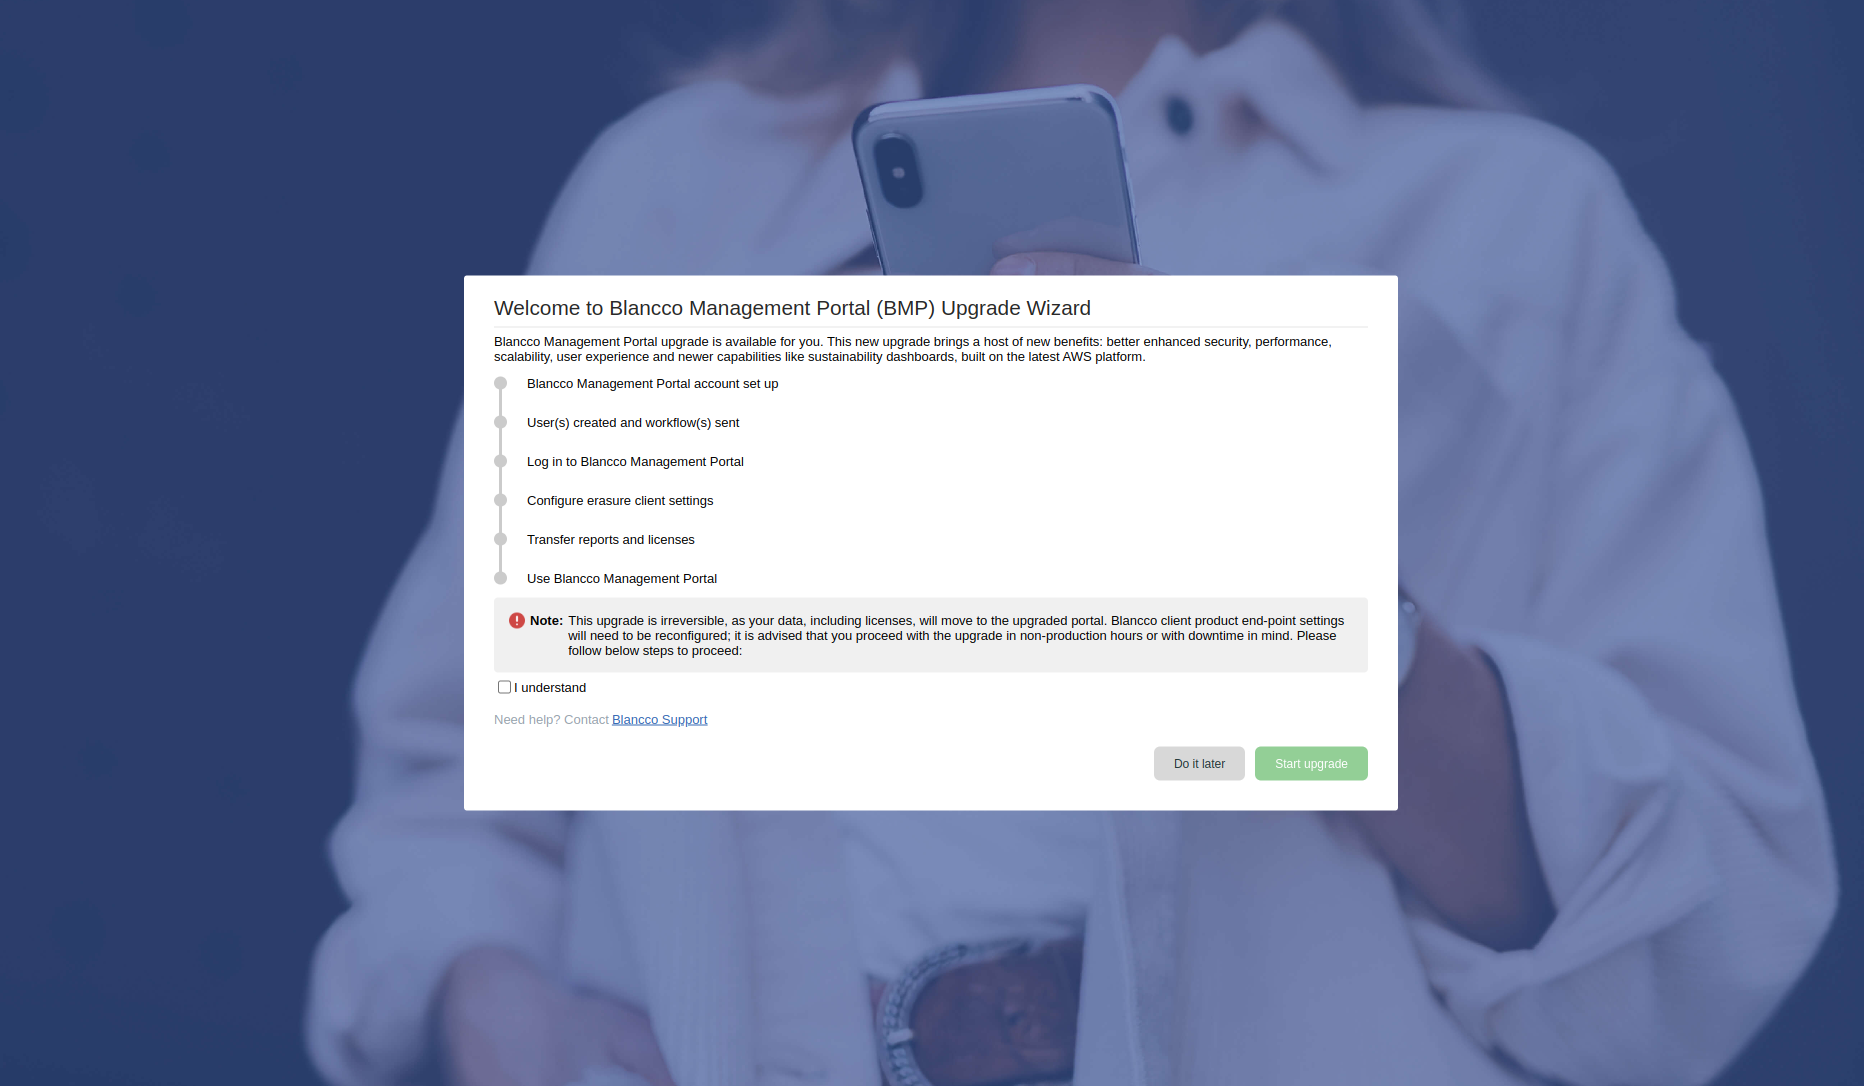
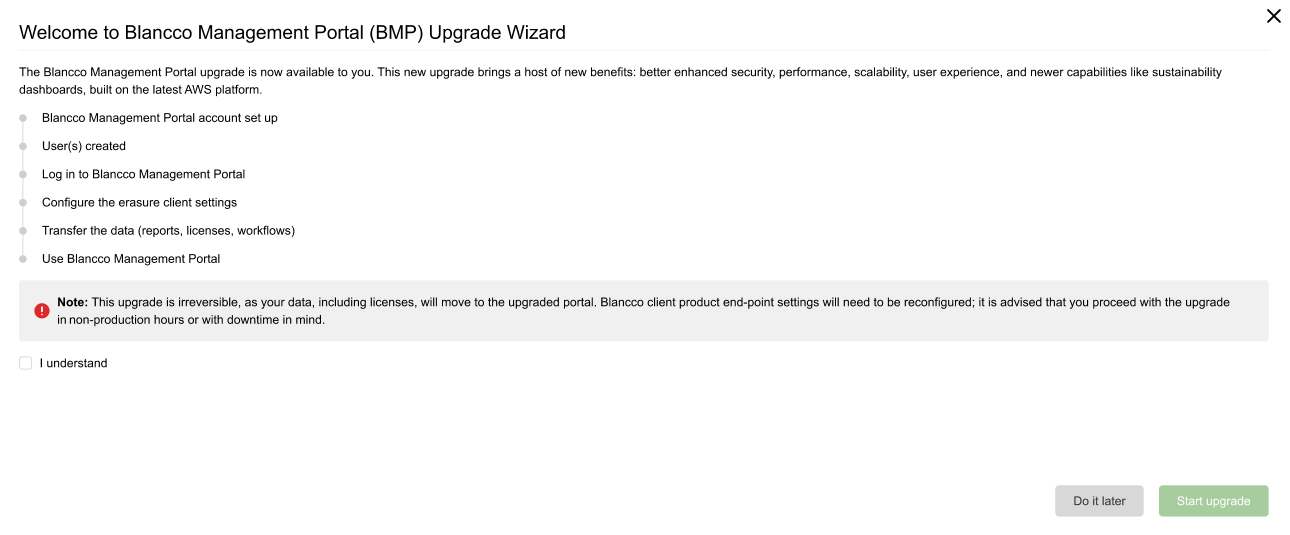
- Initially you will see "Welcome to Blancco Management Portal (BMP) Upgrade Wizard" page. This page will list the different steps you need to complete as part of the upgrade. In order to continue "I understand" checkbox needs to be selected.
 Upgrade Wizard」のページが表示されます。このページには、アップグレードの過程で完了しなければならない、処理のステップが一覧で表示されます。続けるには、「I understand (理解しました) 」チェックボックスの選択が必要です。
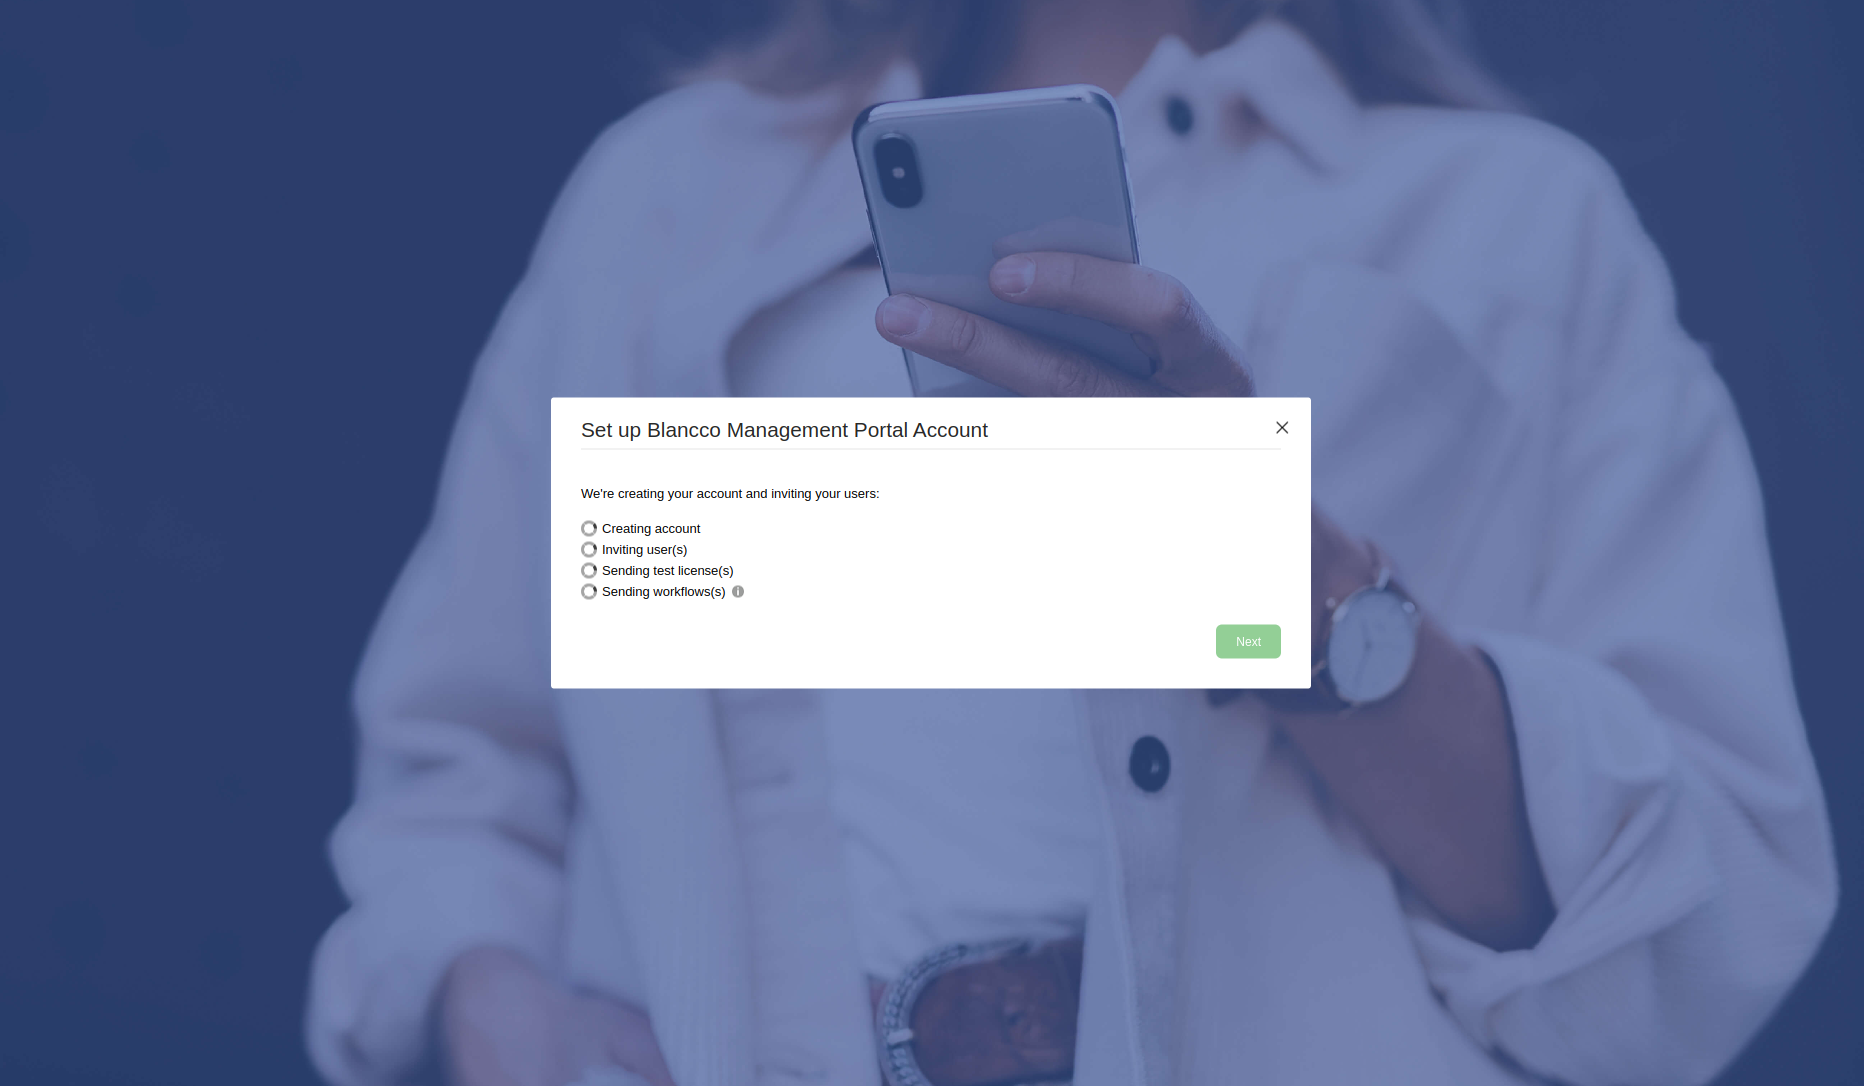
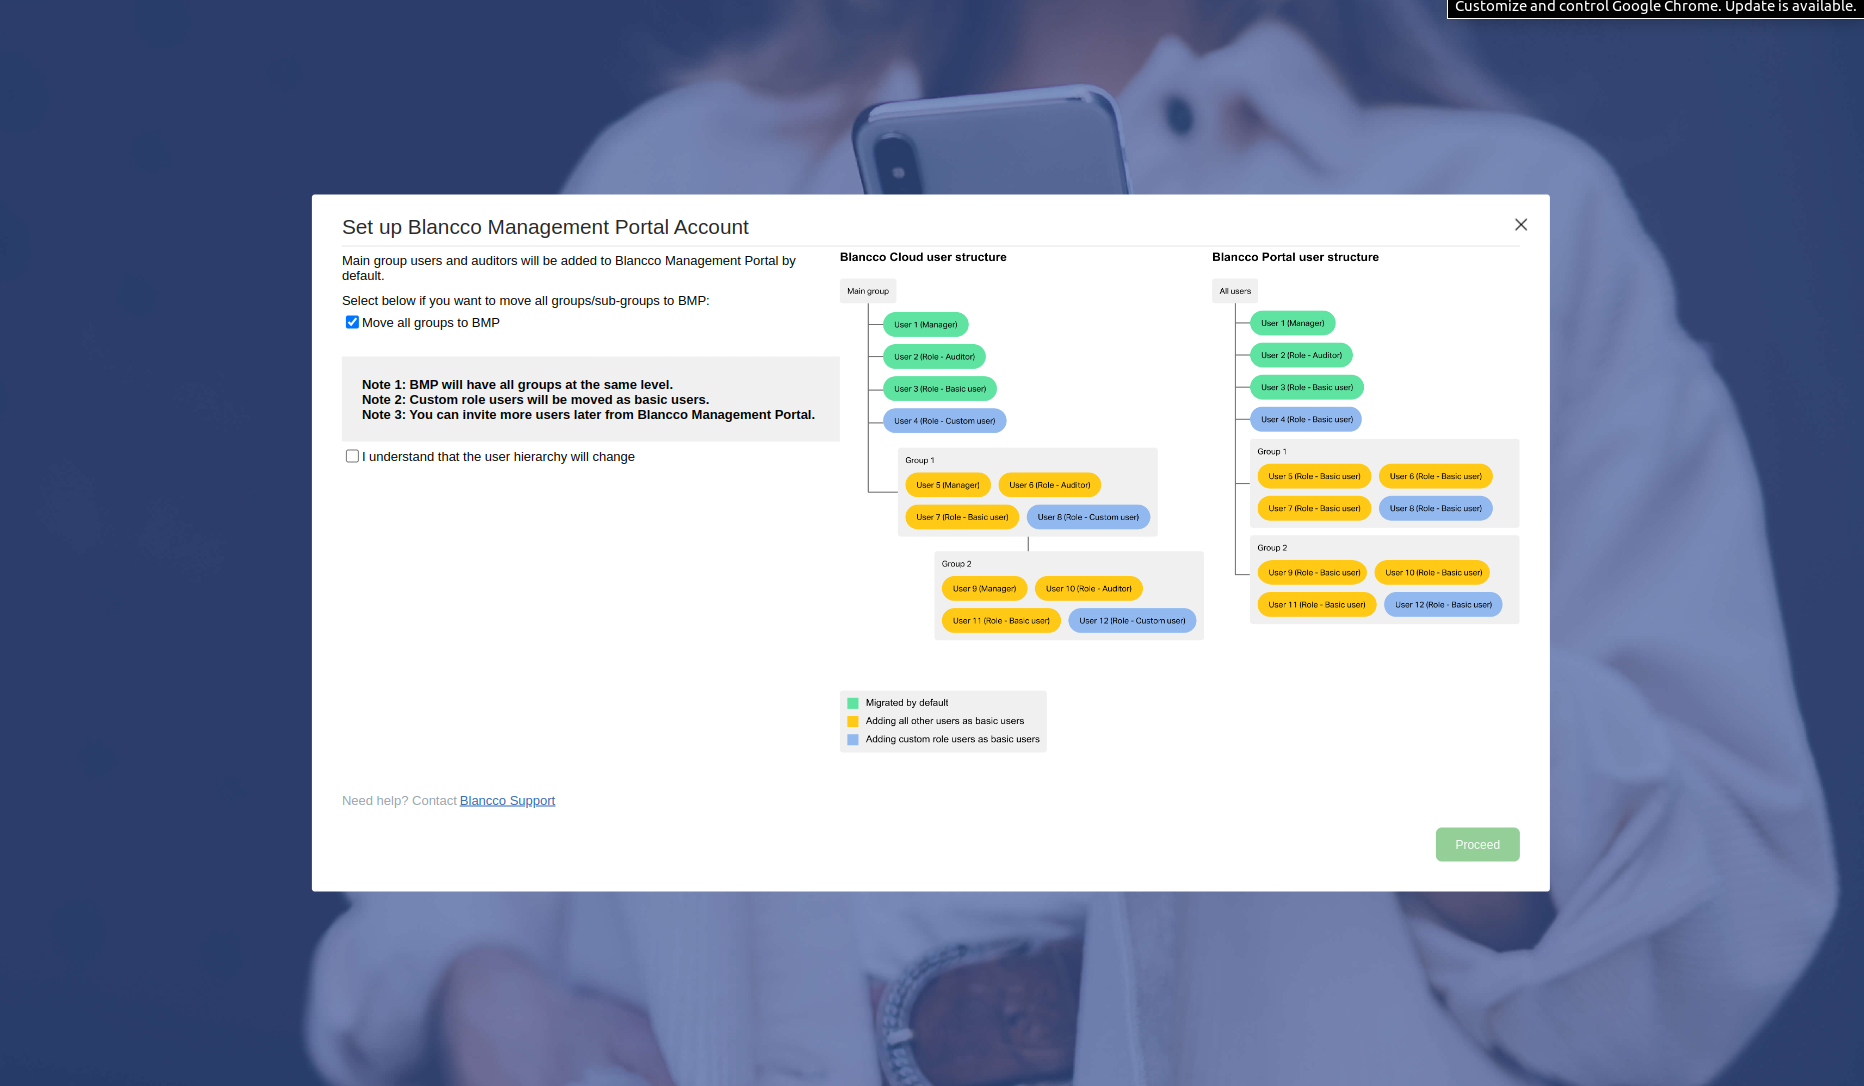
 - 「Set "Set up Blancco Management Portal Account ". During this step you will define the user accounts you want to copy over automatically from your existing Blancco Cloud group(s). Select preferred options and check "I (Blancco Management Portalのアカウントを設定する) 」このステップでは、既存のBlancco Cloudのグループから自動的にコピーするユーザーアカウントを指定します。適切なオプションを選択し、「I understand that the user hierarchy will change " to proceed.

- By default (none of the available checkboxes selected) all manager, basic user and auditor users from your main group will be included. These users are indicated by the green color in the example structure included in the page.
- When "Add all other users as basic users" is selected any user with manager, basic user or auditor role located in any sub-group will be included in addition to the users in the main group. These users are indicated by the yellow color in the example structure included in the page.
- When "Add custom role users as basic users" is selected any user with a custom role will be included in addition to other selected users. These users are indicated by the blue color in the example structure included in the page. Note that "Add all other users as basic users" will need to selected as well if you have users with custom roles in any sub-group and you want to include these users as part of the upgrade. This is presented as the user 8 in the example structure (requires both options to be checked in order to included).
- An account will be created, defined users invited to the system and test licenses will be added to your new Management Portal account. Depending on the number of users this might take a few minutes.
- (ユーザー階層が変更されることを理解しました) 」にチェックを入れて続行します。
- デフォルト (どのチェックボックスも選択されていない状態) では 、メイングループのすべてのmanager、basic user、およびauditorが含まれます。構造図の例では、これらのユーザーは緑色で示されています。
- サブグループに属するmanager、basic user、auditorロールのユーザーは、メイングループ直下のサブグループに移動されます。これらのユーザーは、構造図の例では黄色で示されています。
- カスタムロールを持つ任意のユーザも移動されます。構造図の例では、これらのユーザーは青色で表示されています。
- アカウントが作成され、指定したユーザーがシステムに招待され、テストライセンスが新しいManagement Portalのアカウントに追加されます。 ユーザー数によっては数分かかる場合があります。
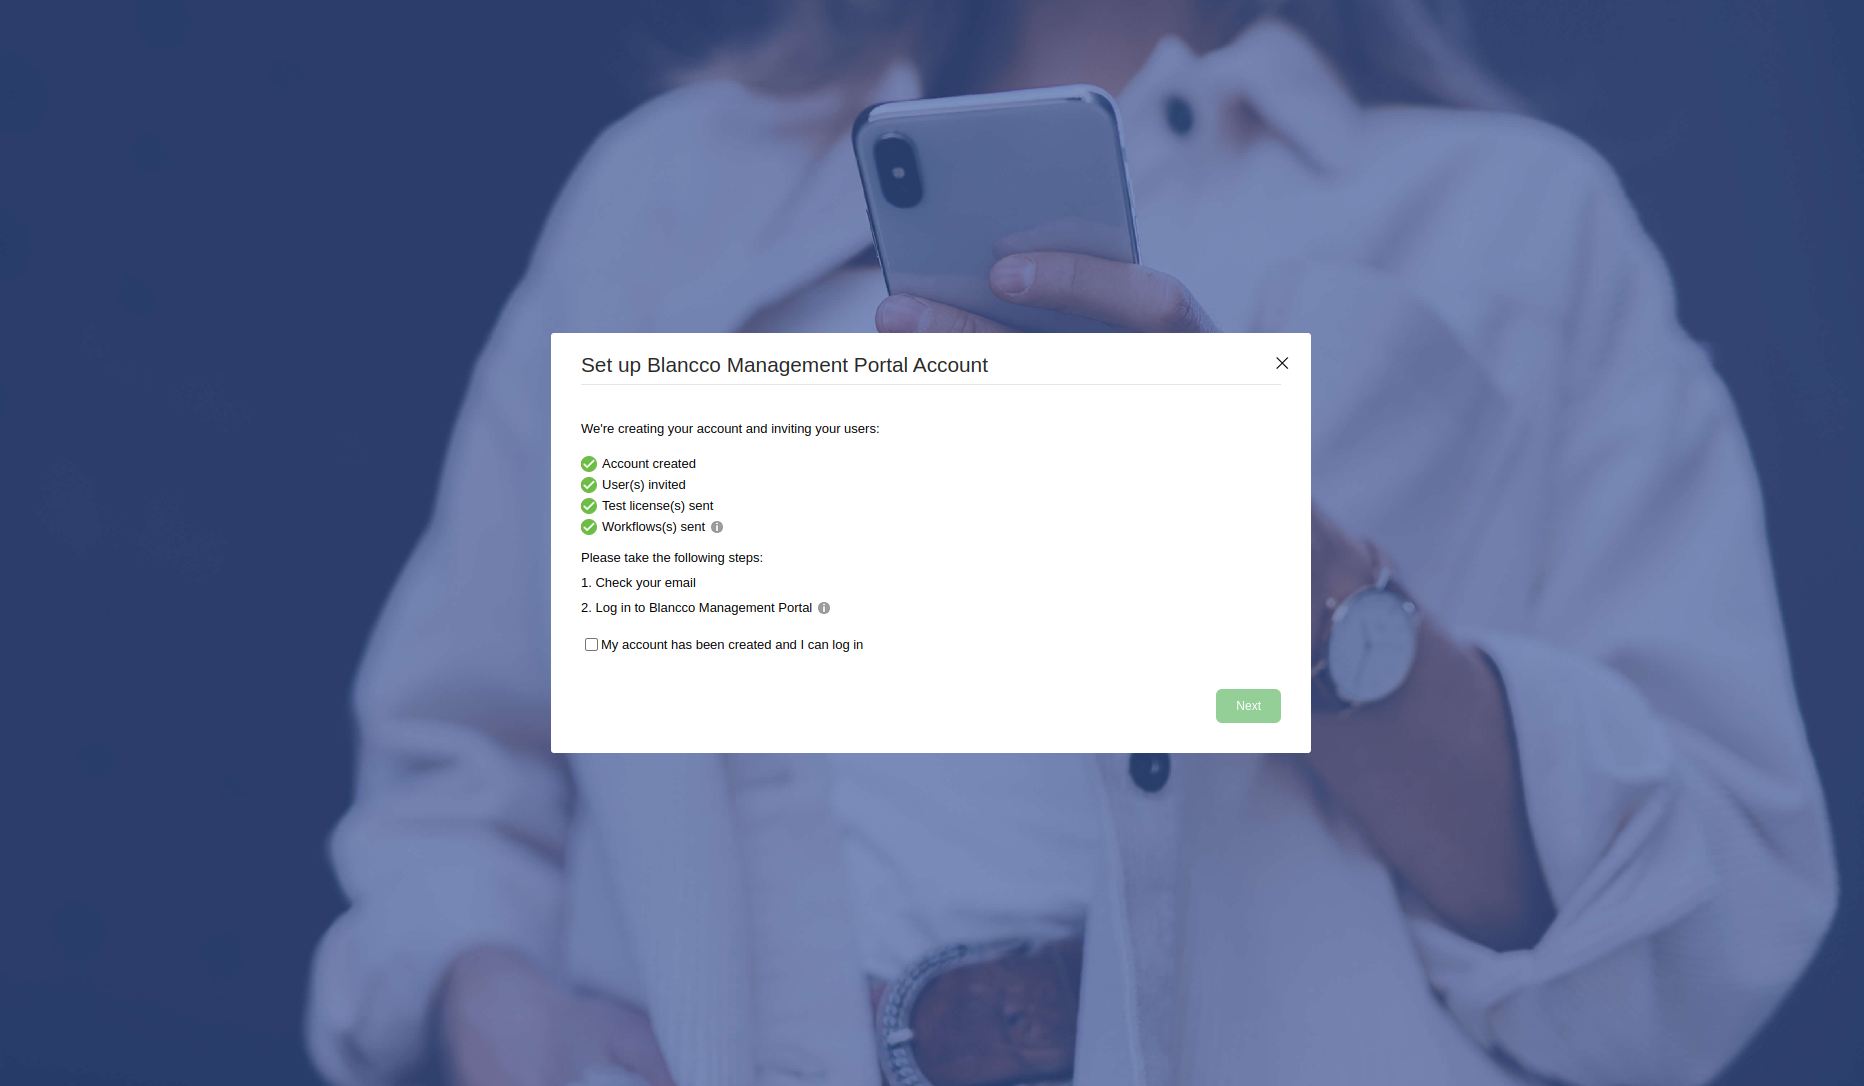
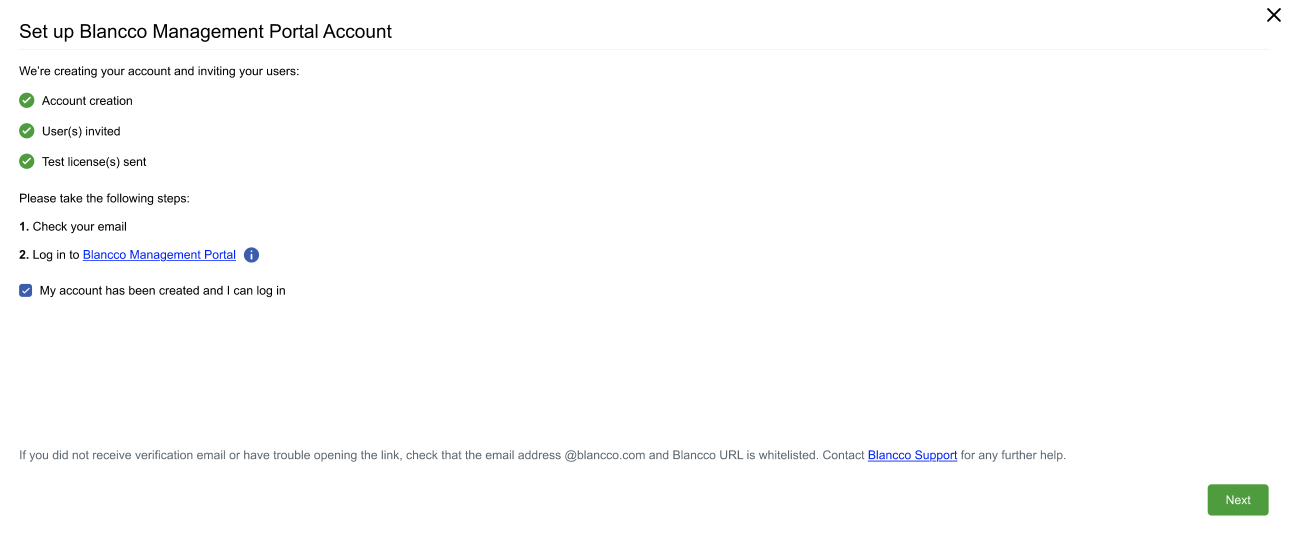
- アカウントとユーザーの作成に成功したら、新しく作成されたManagement Portalのアカウントとログインを検証する必要があります。アカウントを検証するには、別途Management Portalから直接送信される電子メールの指示に従います。サインアップとManagement Portalへのログインが完了したら、「My After successfully creating the account and the users you are required to validate your newly created Management Portal account and login. In order to validate your account follow instructions on the separate email you receive directly from Management Portal. Once you have managed to complete the sign up and login to Management Portal select "My account has been created and I can log in" and then click "Next".
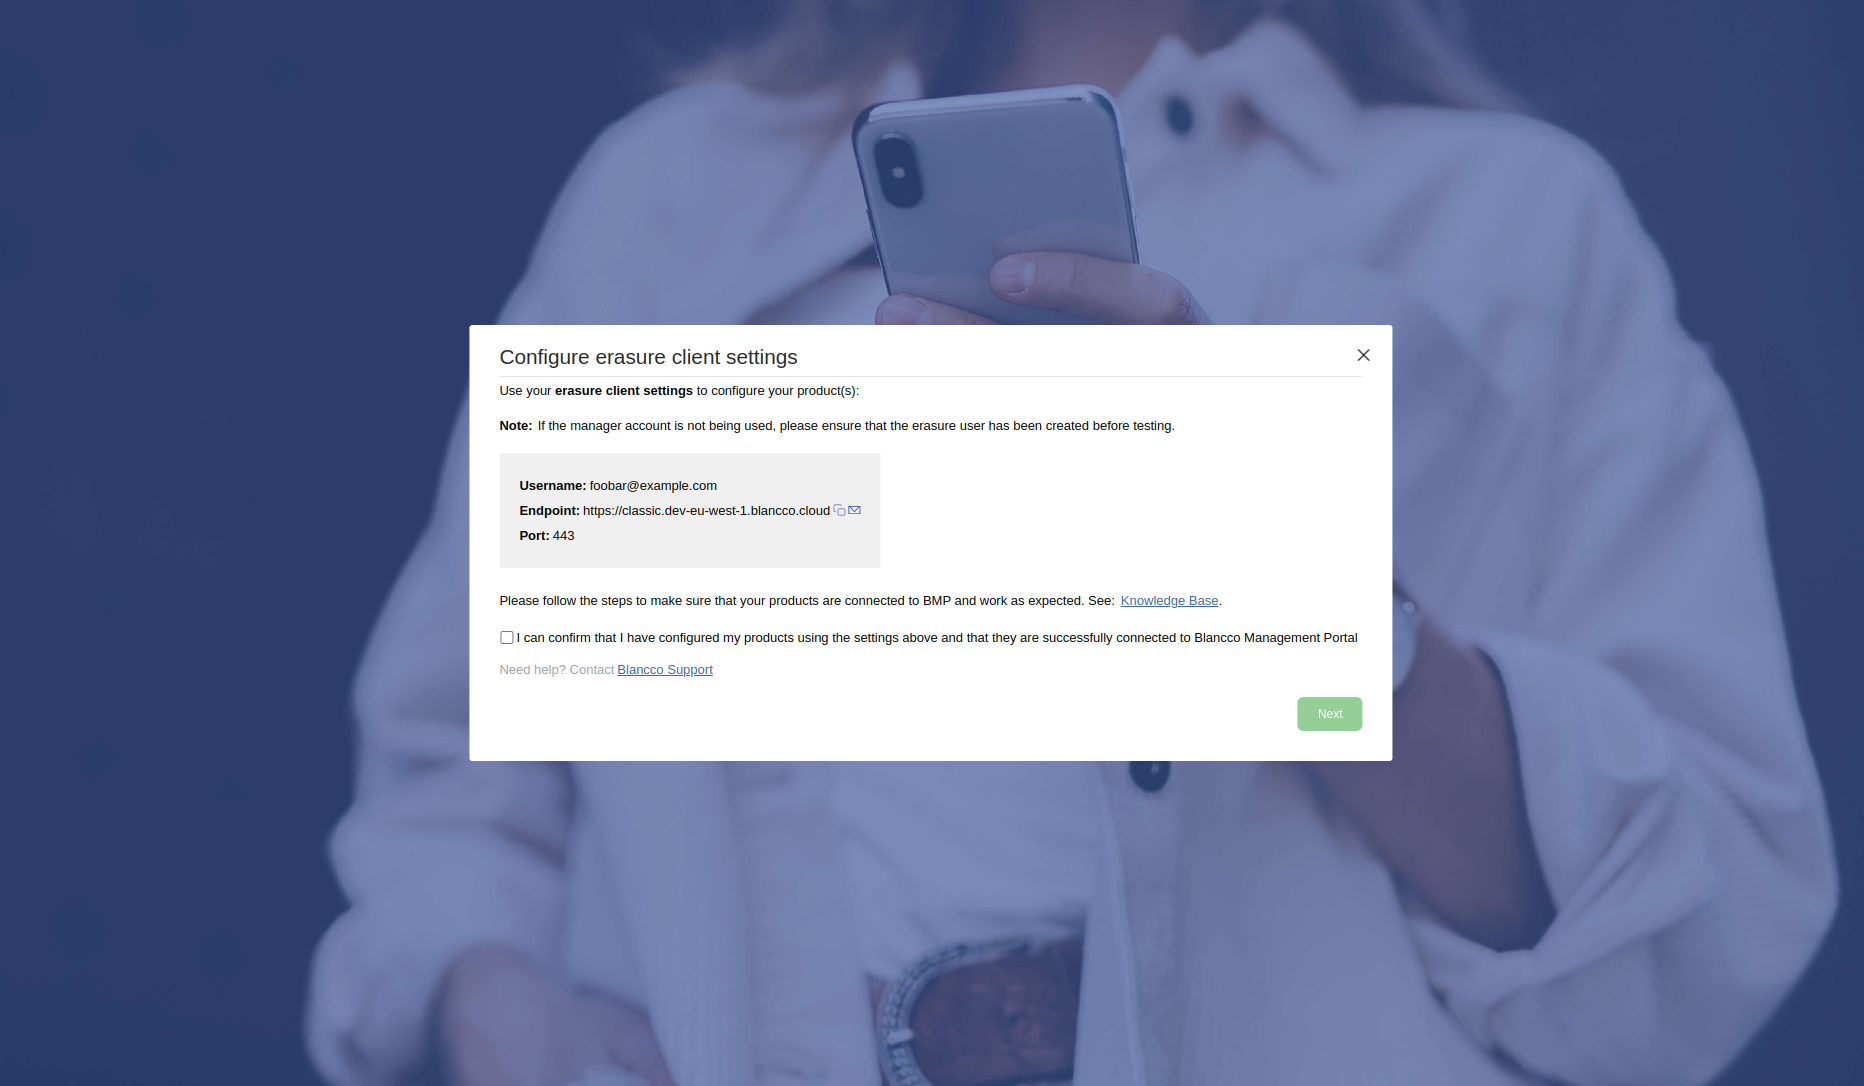
- "Configure erasure client settings" page provides you with the new communication settings you will need to use in order to consume licenses/send reports to Management Portal. After you have tested the communication works with the updated settings check the "I can confirm..." checkbox and select "Next".
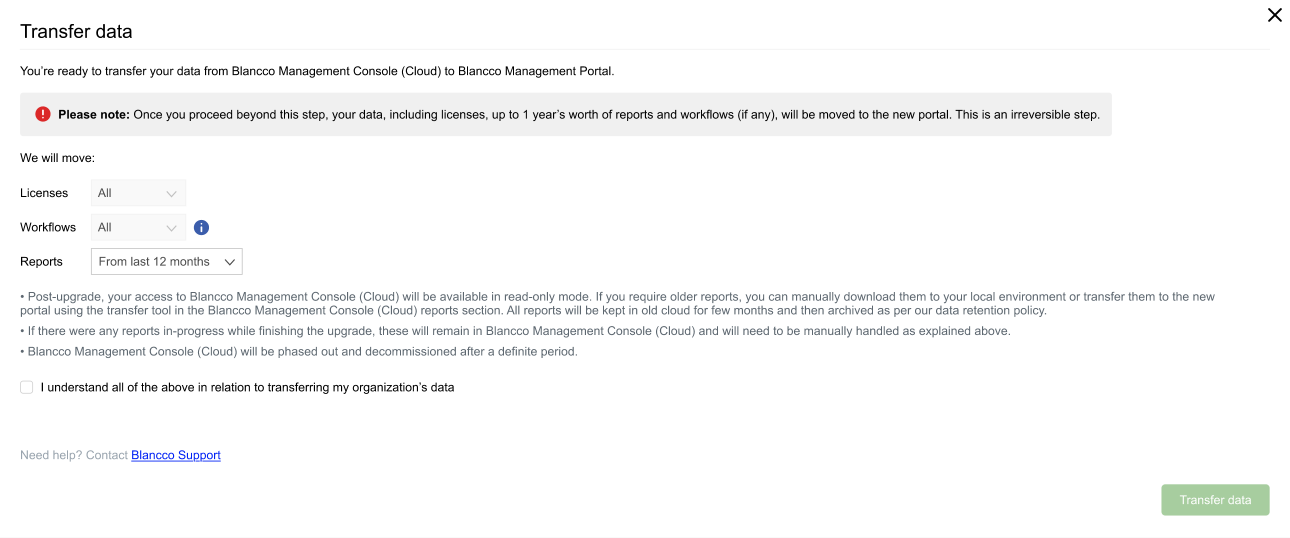
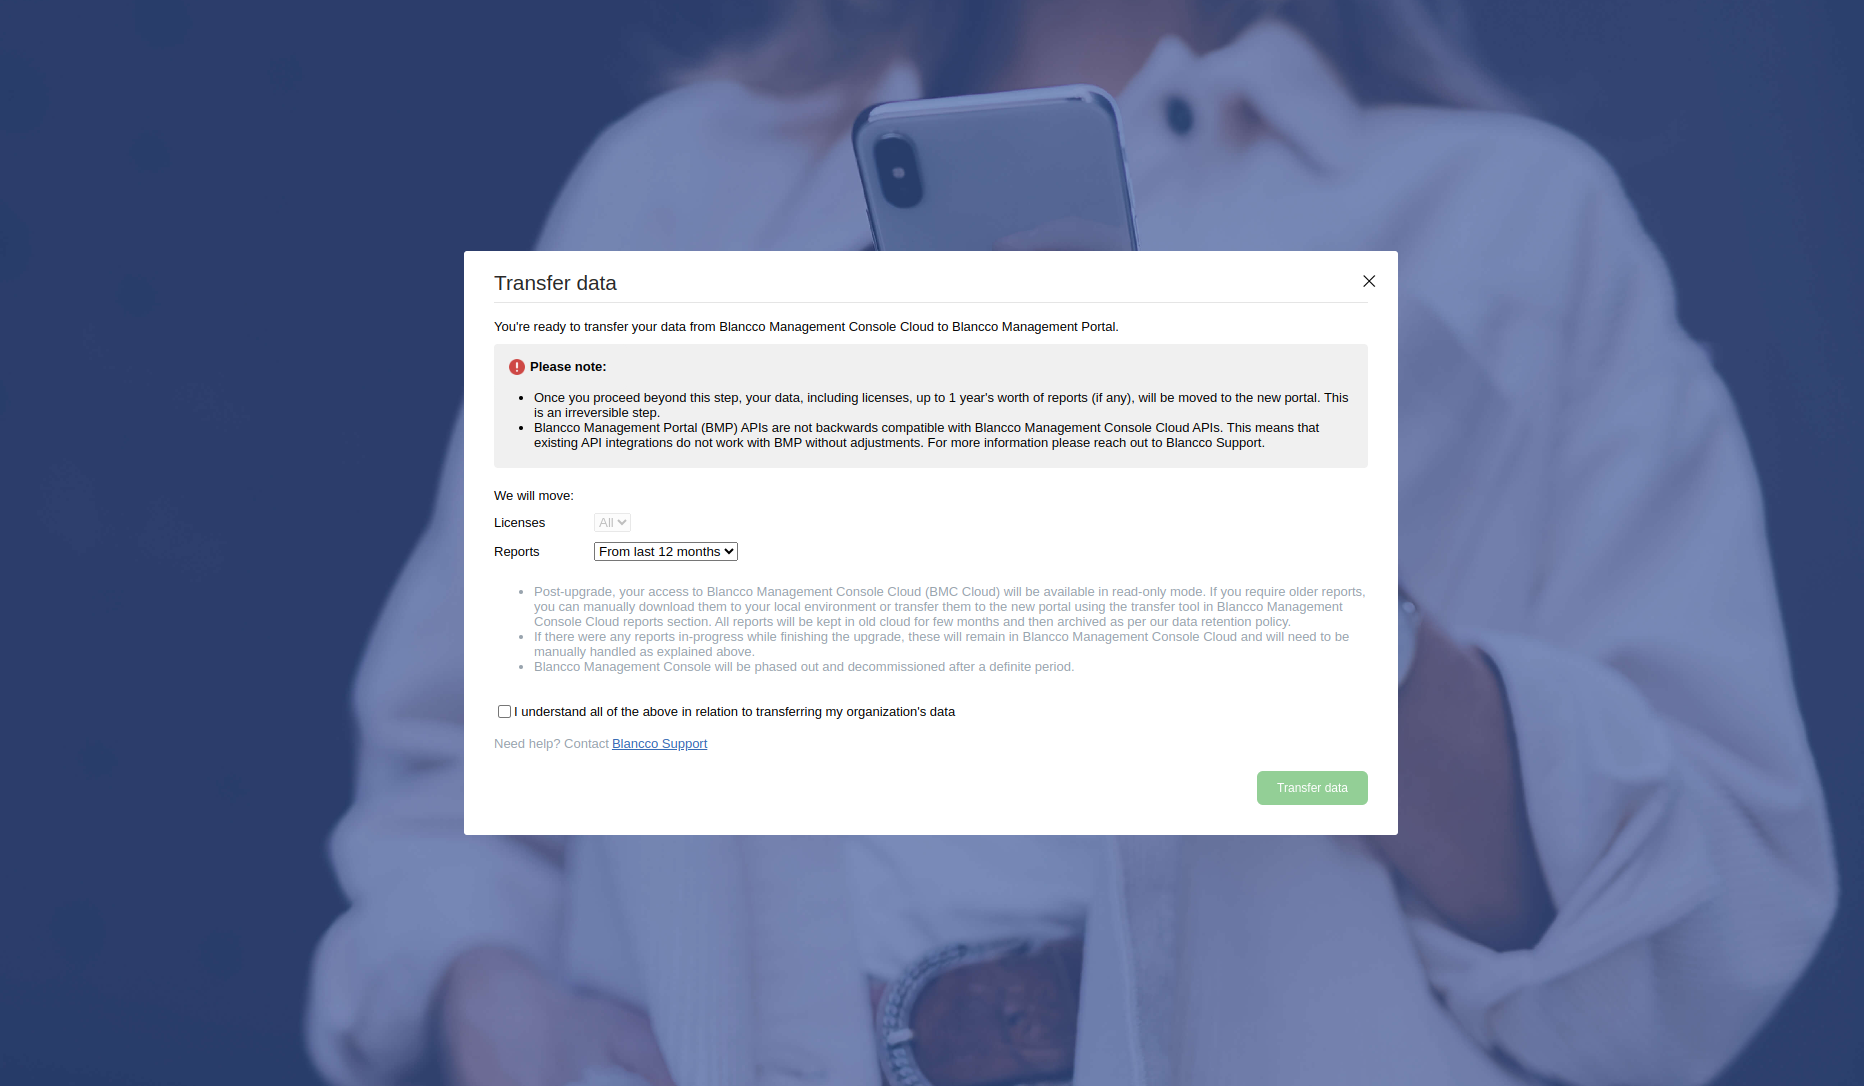
"Transfer data" allows you to define the data copied over as part of the process, by default all licenses and workflows are included and user cannot edit these options. If you want copy over existing reports you can select either last 6/12 months worth of reports. If you need older reports to be available on the Management Portal, they need to be transferred over manually.
Warning After you confirm and click "Transfer data" your data will be copied over and your existing Blancco Cloud account will go into a read only mode and you cannot consume licenses from Blancco Cloud anymore.
Any further erasures will need to be carried out using Management Portal instead.
- login」を選択し、「Next」をクリックします。
- 「Configure erasure client settings" (消去クライアント設定の構成) 」ページには、ライセンス消費やManagement Portalへのレポートの送信に必要な新しい通信設定が表示されます。アップデートした設定で通信機能をテストしたら、「I can confirm...」チェックボックスにチェックを入れ、「Next」を選択します。
- Blancco Cloud APIを使用している場合は、Blancco Management PortalのAPIの仕様を確認し、変更を計画してください。
- 詳しいAPIガイドはBlancco Management Portalログイン後の「サポート」タブ内にあります。
- 補足のためのナレッジベースページも「Management Portal - API」にあります。
Warning Blancco Management PortalのAPIエンドポイントは後方互換ではありません。
APIを利用するには新しいAPIの仕様に合わせた変更が必須となります。
- 「Transfer data (データの転送) 」では、コピー対象のデータを指定できます。デフォルトでは、すべてのライセンスとワークフローが含まれ、ユーザーはこれらの選択を編集できません。既存のレポートをコピーする場合は、過去6ヶ月/12ヶ月分のレポートのいずれかを選択することができます。それ以前のレポートをManagement Portalで利用する必要がある場合は、手動で転送する必要があります。
Warning Blancco Management PortalのAPIエンドポイントは後方互換ではありません。
APIを利用するには新しいAPIの仕様に合わせた変更が必須となります。Transfer data (データの転送) を行う前にこの点に注意してください。
Warning 確認後に「Transfer data (データの転送) 」をクリックすると、データがコピーされ、既存のBlancco Cloudアカウントは読み取り専用モードになり、Blancco Cloud からライセンスを消費することはできなくなります。
それ以降、データ消去作業はBlancco Management Portalを使って行う必要があります。
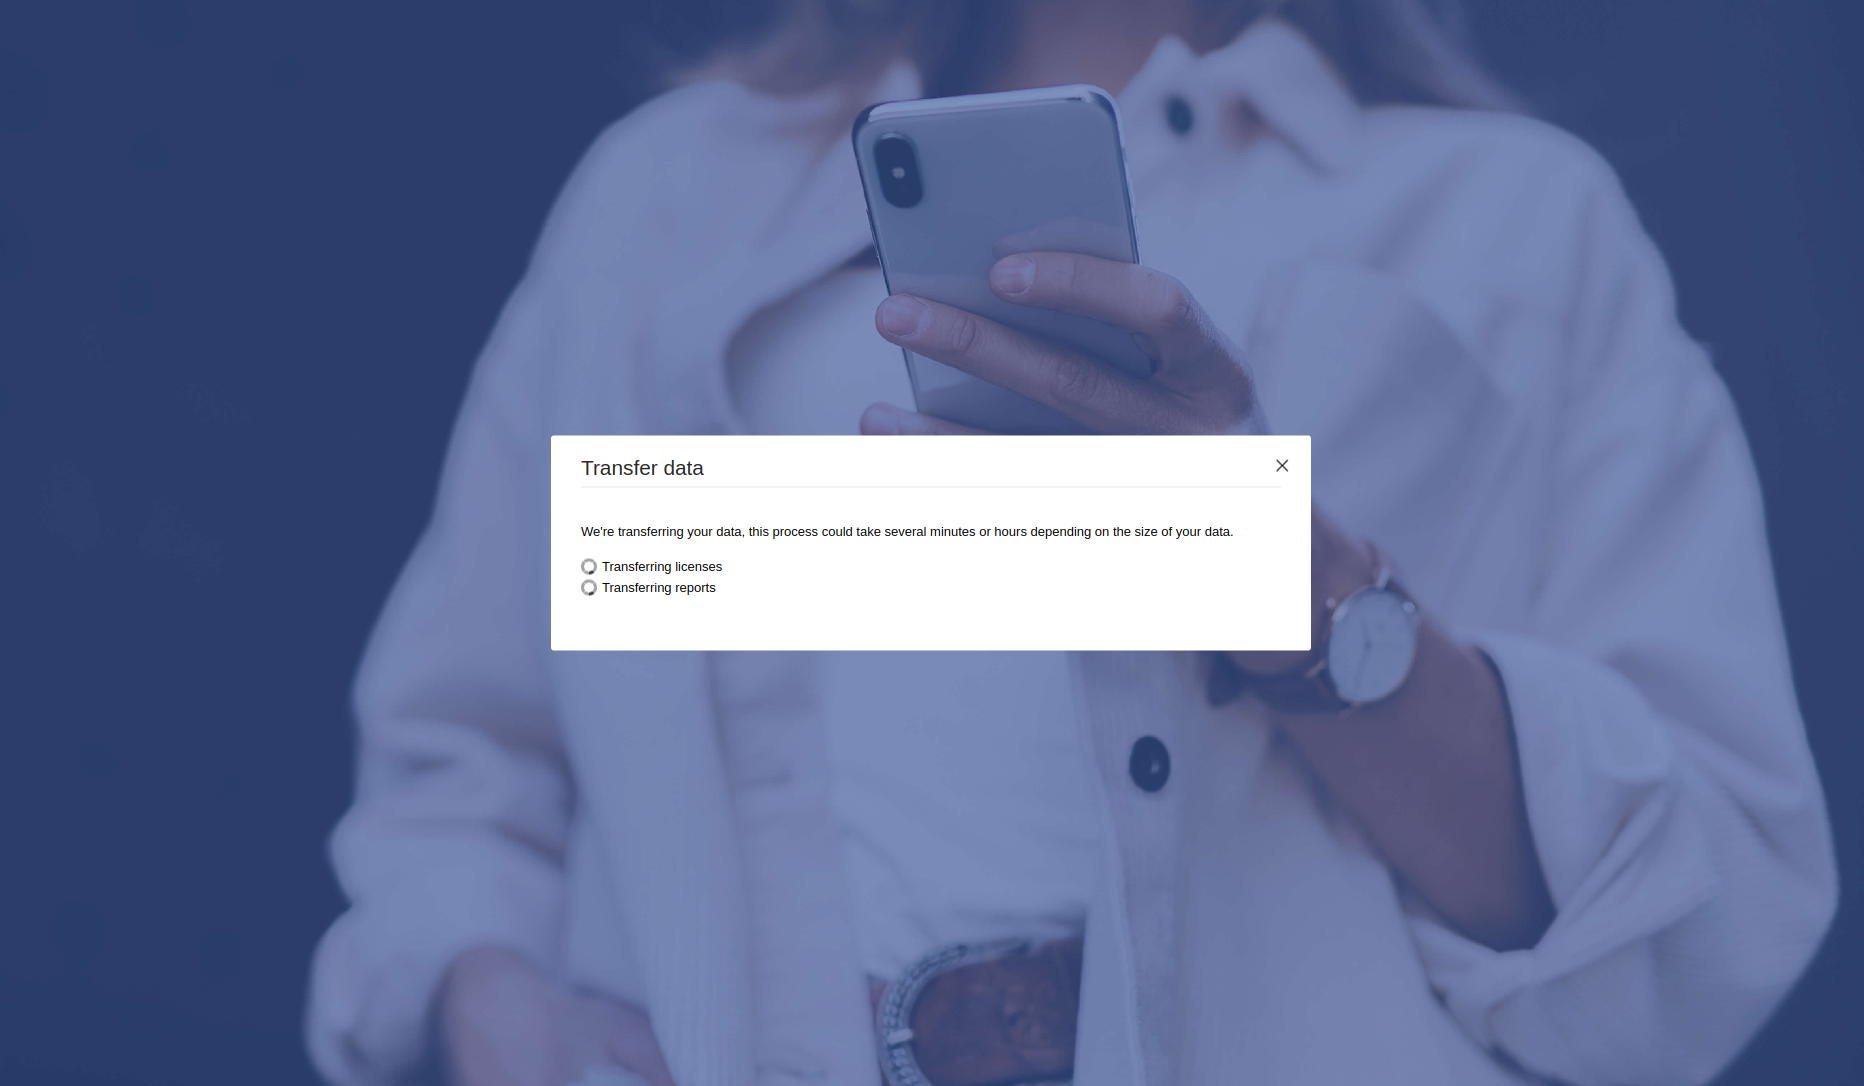
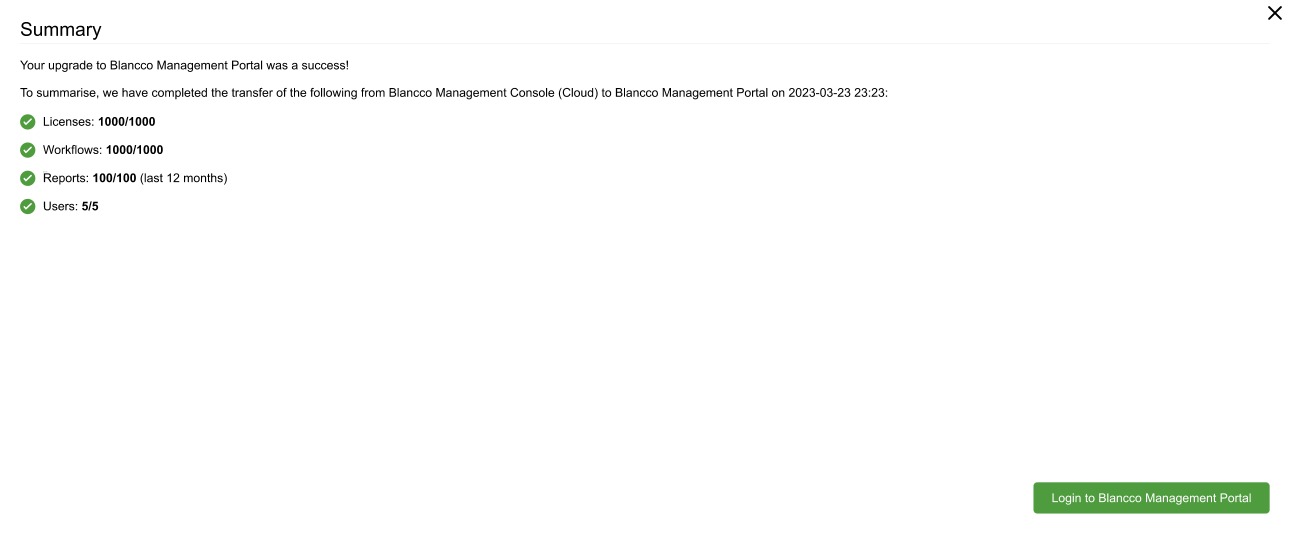
- データの移行処理が完了すると、「Summary (概要) 」ページが表示され、データ移行の結果が表示されます。この段階で何か問題やエラーが生じた場合は、Blanccoテクニカルサポートまでお問い合わせください。
 "Summary" page will appear once the data migration process is completed and you will be presented with the results of the data migration. If there are any issues or errors reported during this stage, please contact Blancco Technical Support for further assistance.