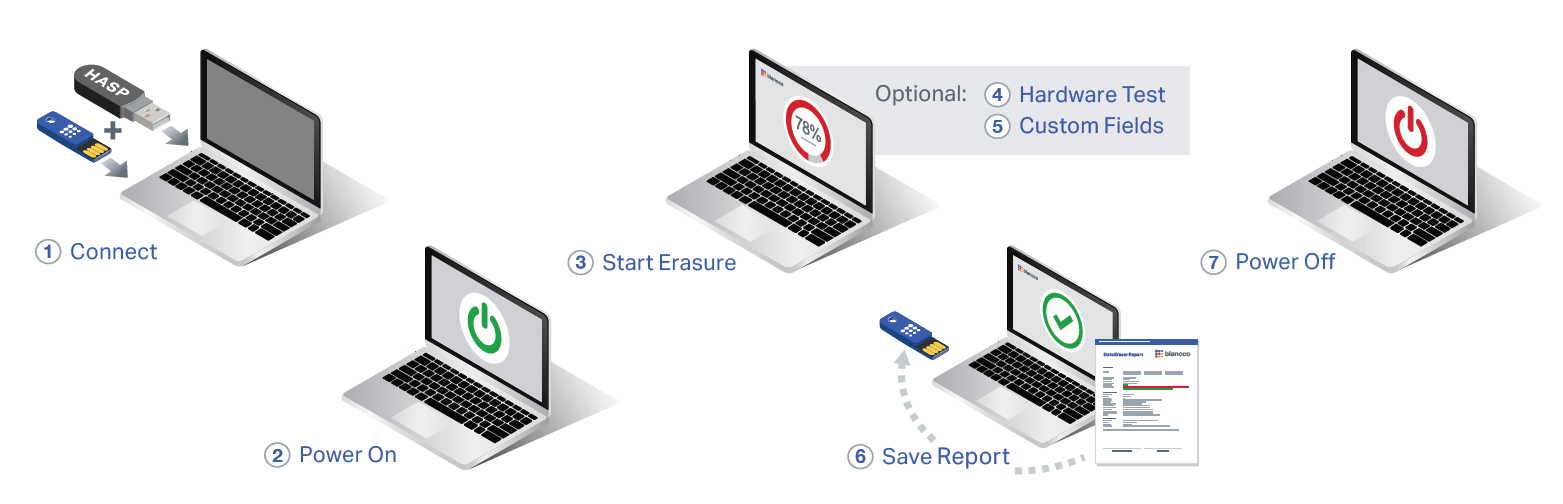
Power on the device and boot from USB stick by selecting the USB stick as the first booting media in the BIOS / UEFI.
Click on “Erase” in the Blancco GUI to start erasure of all detected drives on the “Erasure” tab.
Start the hardware tests (optional) on the “Hardware” tab.
Fill in information to the custom fields (optional) on the “Edit & Input” tab.
Save the report on the connected USB stick by clicking on the “Save” button on the “Report” tab.
Press F10 or click on the “Shutdown“ button on the top right corner to power off the device.
Image Removed
Key
USB-Stick mit dem zu löschenden Gerät verbinden. Minimale Hardwareanforderungen sind im vollständigen Handbuch zu finden.
Gerät einschalten und den USB-Stick als Startmedium im BIOS/UEFI einstellen/auswählen.
In der Blancco-Oberfläche im "Löschung" Tab auf "Löschen" klicken, um die Löschung auf allen erkannten Laufwerken zu starten.
(Optional) Start dar Hardwaretests im "Hardware"-Tab.
(Optional) Im "Eingabe & Bearbeiten"-Tab die benutzerdefinierten Felder ausfüllen.
Den Bericht durch einen Klick auf "Speichern" im "Bericht"-Tab auf den verbunden USB-Stick speichern.
F10 drücken oder auf "Herunterfahren" in der oberen rechten Ecke klicken, um das Gerät auszuschalten.
Image Added
Weitere Einzelheiten und eine vollständige Liste der Funktionen finden Sie im vollständigen Benutzerhandbuch im For more details and full list of features please refer to the full user manual, available on Support Portal.
UI Tab
title
Getting Started with Blancco Cloud
Erste Schritte mit der Blancco Cloud
Stellen Sie sicher, dass auf dem zu löschenden Gerät eine Internetverbindung vorhanden ist.
Gerät einschalten und den USB-Stick als Startmedium im BIOS/UEFI einstellen/auswählen.
In der Blancco-Oberfläche im "Löschung" Tab auf "Löschen" klicken, um die Löschung auf allen erkannten Laufwerken zu starten.
Sie werden aufgefordert, Ihre Blancco Cloud-Anmeldeinformationen einzugeben. Nach der Eingabe der Anmeldeinformationen wird die Löschung gestartet.
(Optional) Start dar Hardwaretests im "Hardware"-Tab.
(Optional) Im "Eingabe & Bearbeiten"-Tab die benutzerdefinierten Felder ausfüllen.
Senden Sie den Bericht an Ihr Blancco Cloud-Konto, indem Sie auf der Registerkarte "Bericht" auf die Schaltfläche "Senden" klicken. Alternativ können Sie den Bericht auf dem angeschlossenen USB-Stick speichern, indem Sie auf der Registerkarte „Bericht“ auf die Schaltfläche „Speichern“ klicken.
F10 drücken oder auf "Herunterfahren" in der oberen rechten Ecke klicken, um das Gerät auszuschalten.
Weitere Einzelheiten und eine vollständige Liste der Funktionen finden Sie im vollständigen Benutzerhandbuch im
Getting Started with Blancco Cloud
Make sure you have internet connection available on the device that needs to be erased.
Power on the device and boot from USB stick by selecting the USB stick as the first booting media in the BIOS / UEFI.
Click on “Erasure” in the Blancco GUI to start erasure of all detected drives on the “Erasure” tab.
You will be requested to fill in your Blancco Cloud credentials. After providing the credentials, erasure will start.
Start the hardware tests (optional) on the “Hardware” tab.
Fill in information to the custom fields (optional) on the “Edit & Input” tab.
Send the report to your Blancco Cloud account by clicking on the "Send" button on the "Report" tab. Alternatively, you can save the report on the connected USB stick by clicking on the “Save” button on the “Report” tab.
Press F10 or click on the “Shutdown“ button on the top right corner to power off the device.
For more details and full list of features please refer to the full user manual, available on Support Portal.