
Page History
Document updated 1 January 2019
Blancco Technical Support Portal
Blanccoテクニカルサポートポータル
当社製品の技術的問題に対する解決策や最新情報の入手、テクニカルサポートチームへのお問い合わせにはBlanccoテクニカルサポートポータル (Blancco Technical Support Portal is located at https://support.blancco.com/ and it is the most efficient way for finding a solution to a technical issue with Blancco products, retrieving product information and contacting the Blancco Technical Support team.
In addition to Incident Management, which is used for creating Support tickets and registering into the Support system, the Support Portal also contains other handy functions:
...
- There are separate categories for each Blancco main product segment: Erasure, Erasure Software Tools, Diagnostics and Hardware.
- In addition the Knowledge Base section contains "General Support Articles" and "Web Store FAQ", which are excellent for troubleshooting Blancco product evaluation and Web Store related issues.
...
) をご利用いただくのが最も効率的です。
サポートポータルはチケット作成用のインシデント管理が主な機能になりますが、下記の機能も含まれています。
- ニュース: 最新の製品リリースとBlanccoサポート関連のニュース (図1) 。
- ナレッジベース: 製品とユーザーマニュアル、ドキュメントに関する情報と、Blancco製品の技術的な問題の解決に役立つナレッジベース記事。
- 主要製品は、消去用製品と関連ツール、検査・診断用製品、ハードウェア製品に分類しています。
- ナレッジベースには、一般的なその他のサポート関連記事も含まれます。
- サポートに関する文書: Blanccoテクニカルサポートの利用にあたって重要な情報です。
- Blancco使用許諾契約: 使用許諾契約 (EULA) へのリンク
- Blancco製品サポートライフサイクルポリシー: 製品サポートの利用可能性に関する情報
- ポータルクイックスタートガイド: 当ページです
- ソフトウェアの脆弱性の報告: ソフトウェアの不具合を報告するための手順
- テクニカルサポートハンドブック: テクニカルサポートチームとその機能に関する詳細情報
- 「サポートに関する文書」からもファイルとしてダウンロードできます。
- 「サポートに関する文書」からもファイルとしてダウンロードできます。

図1: ニュースセクション
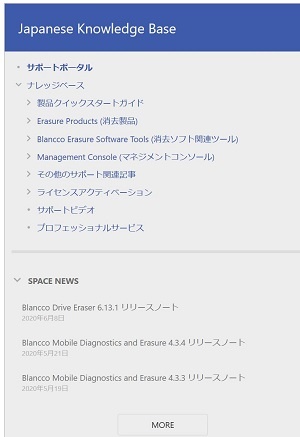
図2: サポートポータルの構成
テクニカルサポートポータルユーザーアカウント登録方法
- こちらのポータルサイトにアクセス
...
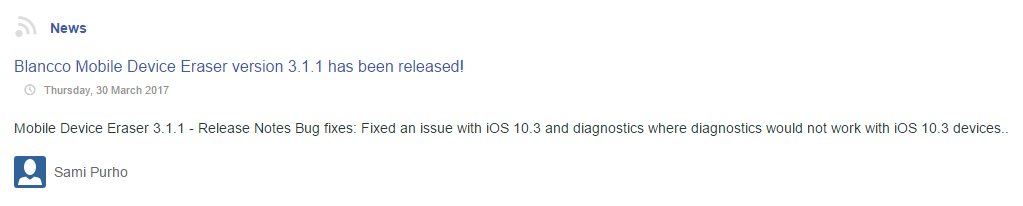
Picture 1. News section
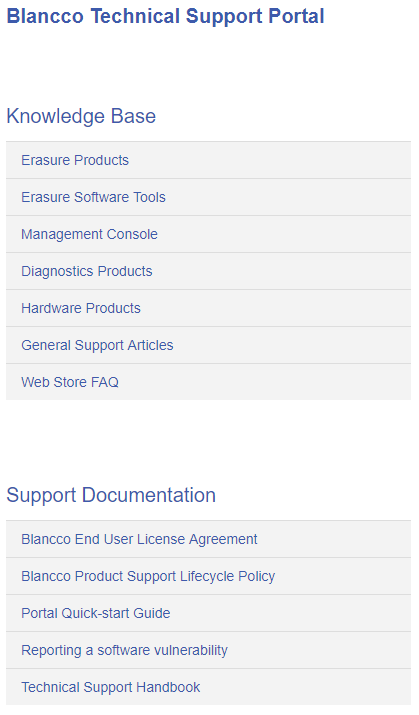
Picture 2. Support Portal structure
Registering a User Account to Blancco Technical Support Portal
- Access the Blancco Customer Portal site at: https://support.blancco.com/
- Click “Report an Incident” button.
- 「Report an Incident」ボタンをクリック。
- 「Sign Click “Sign up for an account” to create your user account.
- Fill in the relevant details and click “Sign up” to log in.
User account and language settings
During the first login, it is recommended to change certain user profile specific settings to guarantee the best user experience and security.
To change profile password:
...
- account」をクリック。
- 詳細情報を入力し、“Sign up”をクリックするとログインできます。
ユーザーアカウントと言語設定
初回ログイン時には、ユーザープロファイル調整と強いパスワードの設定を行ってください。
プロファイルからのパスワード変更方法:
- 右上隅にあるユーザーアバターをクリック (図3) 。
- “Profile” をクリック。
- “Change password” をクリックしてパスワードを変更します。
- 強いパスワードのご利用を推奨します。
- 強いパスワードのご利用を推奨します。
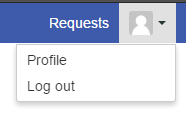
図3. プロファイル (Profile) を開く
プロファイルの変更方法:
- 右上隅にあるユーザーアバターをクリック (図3) 。
- “Profile” をクリック。
- “Edit your Profile”をクリック (図4) 。
- “Name” フィールドをクリックして氏名を正しく設定してください。
- “Language” ドロップダウンから希望の言語を選択してください。
- 言語を変えると、ユーザーインターフェイスの言語とサポートシステムで生成されるメッセージの言語が変わります。
- 注: 一部の画面はまだ翻訳されておらず、英語でのみ表示されることがあります。また、言語設定を変更しても、メインのサポートページ(
...
Picture 3. Accessing Profile settings
To change profile settings:
- Click the user avatar logo on the top-right corner (Picture 3).
- Click “Profile”.
- Click “Edit your Profile” to change profile settings (Picture 4).
- Click the “Name” field to change the profile.
- Click the “Language” drop-down menu to select your language.
- Selecting a language will change the user interface language and the language of the Support system generated messages.
- Note: Some of the user interface items might not be translated yet and are only displayed in English. Changing the language setting does not change the appearance of the main Support page (https://support.blancco.com).com)の表示は変わりません。
- “Time zone”ドロップダウンから自身のタイムゾーンを選択してください。Click the “Time zone” drop-down menus to change time zone settings.
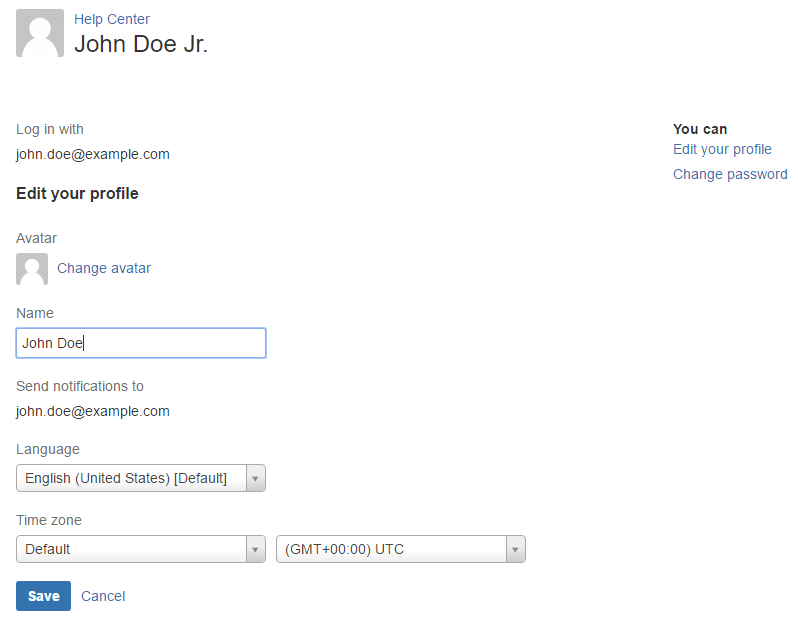
Picture 4図4. Profile settings
Creating a Technical Support Ticket
プロファイル設定
テクニカルサポートチケットの作成方法
- まずは「What If you have a specific issue in mind, try searching for a solution from the Blancco Knowledge Base by typing relevant keywords to the “What do you need help with? ” field.
- If you are not able to find the answers you are looking for, then create a support incident. Click “Technical Support Request”.
- Fill in the fields as carefully as possible and click “Create”.
- Once completed, you will be provided with a summary of your support ticket, and an engineer will respond according to SLA’s outlined in the Support Plans section of our Support FAQ document.
The Technical Support Ticket and Communicating with the Technical Support
The best way to handle the ticket related communication, is to do it from “Requests” view which lists all the Technical Support tickets associated with your user account. To see your requests you will need to login in to the Blancco support portal.
- (何かお困りですか?) 」フィールドに調べたい事柄を入力し、ナレッジベースの情報を検索してみてください。
- 目的の情報がみつからなかった場合、“Technical Support Request” をクリックしてサポートチケットの作成に進んでください。
- 各入力欄に正確な情報を入力し、「Create (新規作成) 」をクリックしてください。
- 完了後、サポートチケットの概要がお客様に送信されます。また、BlanccoのエンジニアがサポートFAQドキュメントのサポートプランのセクションで概説されているSLAに従って対応します。
テクニカルサポートとの連絡
チケットに関する連絡や状況の確認を行うには、お客様のテクニカルサポートチケットが一覧できる「リクエスト」ビューを利用いただくのが効率的です。なお、テクニカルサポートポータルにログインした状態でないとこのビューを見ることはできません。
- こちらのBlancco Customer PortalにアクセスAccess the Blancco Customer Portal site at: https://support.blancco.com/
- Click “Report an Incident” button.
- Login with your personal credentials (if you don't have account, see "Registering a User Account to Blancco Technical Support Portal")
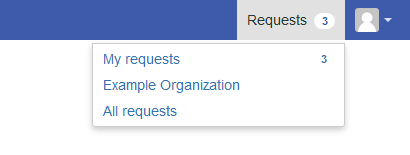
After logging in, you can see overview of your tickets by selecting "Requests" from top right corner and selecting "My requests". The number next to it tells the amount of open tickets you have at the moment. If you want to see overview of the tickets reported by your organization click on the name of the organization ("Example Organization" in the Picture 5.).
NOTE. If you don't have the organization view available, please contact Blancco Technical Support in order to start using this feature.
Picture 5. Requests
Picture 6. Ticket overview
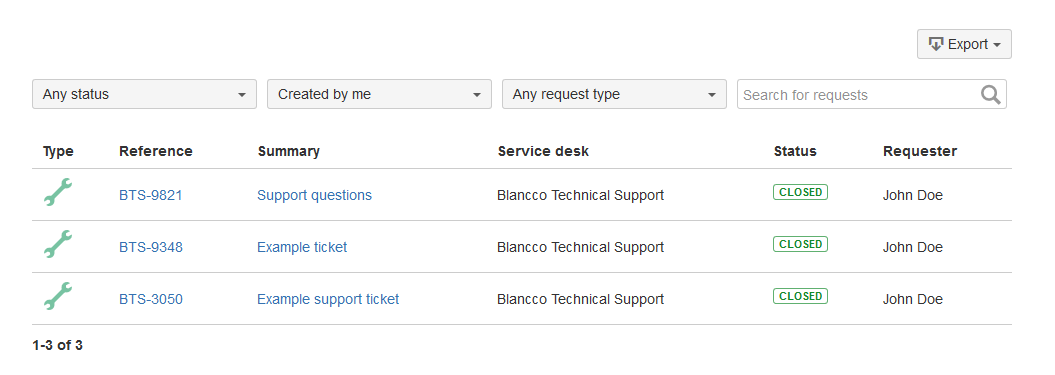
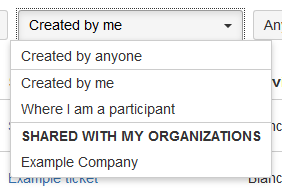
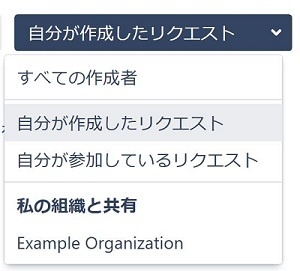
In the overview you can filter the tickets according to their status and reporter. If you want to change the view between the tickets reported by you and ticket reported by your organization, you can do that by selecting different filter from the "Created by me" dropdown.
If you want to see ticket reported by you, select "Created by me".
If you want to see ticket reported by your organization, select corresponding organization under the "Shared with my organizations" section. (NOTE. If you don't have the organization view available, please contact Blancco Technical Support in order to start using this feature.)
All the ticket history, including the status changes, can be accessed by clicking the ticket’s “Reference” ID. The “Activity” section lists all the events and comments related to the ticket. To add comments to the ticket, click the “Comment on this request…” section, click the “Add” button and type in your comment and it will be visible for the Technical Support Team member handling the ticket.
In addition, you will also receive email notifications when an event occurs with your open tickets (comments from Support, status changes, etc.). You can also directly reply to the email notification, which will keep the ticket communication going. It is highly recommended that you only use a single email address to contact Technical Support. Using multiple email accounts may result into duplicate Support tickets.
Additional Technical Support Ticket Related Features
- Incident”ボタンをクリック。
- 自身のユーザー名とパスワードを使ってログインします。アカウントをまだ作成していない場合は「テクニカルサポートポータルユーザーアカウント登録方法」をご参照ください。
ログイン後、右上から「リクエスト」を選択し、「マイリクエスト」を選択すると、チケットを確認できます。隣に表示される数字は、現在のオープン (未解決) チケットの数を示しています。所属組織から報告されているチケットを表示するには、組織の名前をクリックします (組織の名前はたとえば図5の「Example Organization」のように表示されます) 。
注: 所属組織のビューをご利用になりたい場合、Blanccoテクニカルサポートにお申し出ください。
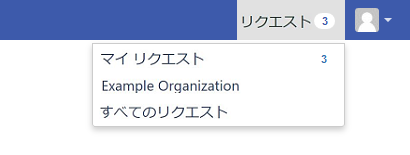
図5 リクエスト

図6 チケットの概要表示
この概要表示では、ステータスとレポーター (作成者) によるフィルタリングが行えます。例として、自分が報告したチケットと同じ組織のユーザーが報告したチケットのビューの切り替えは「自分が作成したリクエスト」ドロップダウンを使って行えます。
このドロップダウンで「自分が作成したリクエスト」を選択すれば、自身が作成したものだけが表示されます。
組織のチケットを表示するには、「私の組織と共有」 以下から目的の組織名を選択してください (所属組織のビューをご利用になりたい場合、Blanccoテクニカルサポートにお申し出ください) 。
各チケットの「参照ID」をクリックするとチケットの過去の履歴が閲覧できます。「アクティビティ」セクションにはすべてのイベントとコメントが一覧表示されます。チケットの「このリクエストにコメント…」セクションをクリックして文章を入力し「追加」ボタンをクリックすると、入力した内容がチケットを担当するテクニカルサポートチームメンバーにも表示されます。
さらに、未解決のチケットでイベント (サポートからのコメント、ステータスの変更など) が発生した時はお客様に電子メール通知が送信されます。この電子メール通知に対して直接返信いただいた場合も、返信内容がチケットにコメントとして追加される仕組みになっています。なお、テクニカルサポートへの連絡には、1つのメールアドレスのみを使用することを強くお勧めします。複数のメールアカウントを使用すると、サポートチケットが重複する可能性があります。
その他のテクニカルサポートチケット関連機能
作成したサポートチケットは、「共有」アイコンをクリックしてフィールドにメールアドレスを入力することで他のユーザーと共有可能です。ただし、すでにテクニカルサポートポータル (The Support tickets that you have created can be shared with other people, by clicking the “Share” icon and typing their email address to the field. It is recommended that you only invite users that have already registered at https://support.blancco.com/.) にユーザー登録済みの人物のみ指定できます。